Home
/
Installation
/
Self-Regulating De-Icing Cable – SRK
How do I test my NAMSR self-regulating cables?
Test your NAMSR self-regulating cable upon receipt of the cable and after securing it to the pipe or roof.
Occasional checks during the installation process are also recommended to test cables for any damage. From there, these tests remain a recommended process before the seasonal usage or after work has been performed in the area (gutter replacement, pipework, etc.). Watch our Installation Video for additional information.
Visual Check
It is always recommended, after installation and during maintenance visits, to visually check the cable and components. Check for bends, debris, tears or undue stress on the cable.
Heating Test
The first obvious test is to check that the cable is heating when powered up. Touch the outer jacket with the bare hand to check for heating. If unsure of the cable’s integrity at that point, use a point-and-shoot laser thermometer to check the cable temperature. Even in snowy conditions or cold weather, a working cable should be 70F or above. A measurement of the outer pipe insulation should give you a 20F+ delta over the ambient temperature at the time.
Amperage Draw
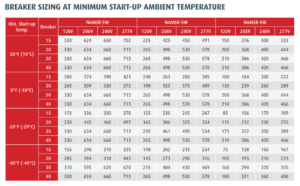
A common issue with self-regulating cable installations is under-sizing of the breaker on the circuit or similarly, putting too much linear footage on a given breaker. In mild conditions, it may still allow the cable to operate, but in more extreme conditions, the amperage draw may increase beyond the capacity of the breaker. Refer to the product literature for more details.
Power up the cable and apply a clamp meter to check total amperage draw. This is best done in mild conditions or before the season to avoid the ‘over-amperage’ situation above that would trip the breaker and prevent a proper reading. Check the insulation resistance below if the breaker trips continuously and the cable won’t power up.

Insulation Resistance
To test the cable’s integrity and ‘insulation resistance’, use a megger (mega-ohmmeter) of 1000 VDC or more. Make sure that the megger does not exceed 2,500 VDC.
Perform the following two tests:
- With one clip on the braided ground and one clip to a metal pipe/gutter
- With one clip on the braided ground and one clip on the heater cable (one at a time)
This will verify that no voltage is escaping from the heating conductors through to the ground braid, and further, that no voltage is transferring from the ground braid to the outer jacket. Minimum readings of 20M Ohms for each circuit is an acceptable level to test for.
Contact Us for Further Assistance
If you have any additional questions or concerns, please don’t hesitate to reach out to us. Our support team is available to assist you and address any inquiries you may have. To access our support services, simply call us at (888) 927-6333.