Home
/
Installation
/
Snow Melting Mat – WSMM
Installation of Snow Melting Mats/Cable under Concrete
Please refer to the installation manual for more information regarding the installation of this product.
INSTALLATION INSTRUCTIONS UNDER CONCRETE
Note: Using a multimeter, an electrician should measure the cable resistance and insulation resistance: (1) before commencing installation, (2) before pouring concrete and (3) after the concrete is poured. Record the readings. If there is a damage STOP and ring 1-888-927-6333.
1. Ensure the paving contractor has a solid base of 4”-8” (102-203mm) of crushed rock aggregate tamped down and ready to receive the pour.
2. Clean the area below the heating mat/cable so that it is free from sharp objects. It is extremely important to keep heavy equipment, machinery, vehicles, sharp shovel, and rake edges away from the cable to prevent damage.
3. For locations that require handrails, it is strongly recommended that the concrete installer pre-sleeves the posts to avoid any and all drilling of the concrete. The mat/cable must be routed around these sleeves/posts to avoid any direct contact with them. See pg 10 “How To Modify the Mat” if you need to alter the mats. The mat/cable must NOT pass through expansion joint locations. Avoid saw-cutting or drilling through cables that are no longer visible beneath the concrete by spray painting lines to mark exactly where expansion joints are located.
4. Place the mat or cable down on top of the tamped aggregate with the mesh facing up. Stake the mesh or cable firmly into the crushed rock so that it remains flat. (Note: test the mats/cables to ensure they have not been damaged and record the readings.)
5. Route the cold lead(s) through rigid PVC or metal conduit(s) to an accessible weatherproof junction box(es). Ensure that none of the heated section enters any conduit. Do not use excessive force to pull the cold leads otherwise it may damage the hot-cold splice. Seal the conduit ends.
6. A ground sensor can be placed outside the paved area. When placed within the paved area (recommended), ensure proper measuring and securing for the base of the sensor itself as it shouldn’t be flushed with the final coat of concrete. The sensor can be mounted on a wood or concrete block.
7. A separate conduit should be used to protect the low voltage sensor wire and must NOT be shared with any high voltage cold lead from the mats/cables.
8. Once the conduits & sensor(s) are in place, the sand can be poured, covering the mats/cables completely without leaving any air pockets, so that the cables are covered by 1.5” (38mm) of sand but not more than 2“ (51mm).
9. An electrician MUST complete the final test and record results of all the mats/cables readings with a multi-meter and megohmmeter and verify that each mat/cable is in good working order and is ready for energizing once the sand has cured.
10. For easy reference, tape your plan [pg 13] to a power distribution board, indicating the location of the heating cables.
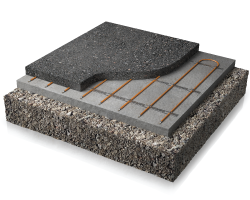
FOR SINGLE POUR INSTALLATION
1. Using a wire mesh or rebar, attach the snow melt mats/cables with plastic zip ties using 3”-4” (51mm-76mm).
2. Then prop up the rebar/mesh with either concrete rubble or brick pavers to the appropriate depth so that the heating mat/cable ends up 2”-3” (51mm-76mm) from the finished surface and no deeper. Make sure the mesh-side is facing up, to protect the cable from shovels and rakes.
3. Once the rebar/mesh/snow melting mat/cable is propped up, route the cold lead(s) through rigid metal or PVC conduit(s) to an accessible weatherproof junction box(es). Ensure that none of the heated section enters any conduit. Do not use excessive force to pull the cold leads otherwise it may damage the hot-cold splice. Seal the conduit ends.
4. A separate conduit should be used to protect the low voltage sensor wire and must NOT be shared with any high voltage cold lead from the mat cables.
5. Once the conduits & sensor(s) are in place, the cement can be poured, covering the mats/cables completely without leaving any air pockets. The concrete should have a minimum thickness of 2“ (50mm) measured from the top of the snow melting mat/cable.
6. An electrician MUST complete the final test and record results of all the mat/cable readings with a multi-meter and megohmmeter and verify that each mat is in good working order and is ready for energizing once the sand has cured. 7. For easy reference, tape your plan [pg 13] to a power distribution board, indicating the location of the heating cables.