Home
/
Programming
/
Terra WiFi Thermostat
How To: Terra Initial Programming
If you recently had Terra installed in your home or if you recently performed a reset to your Terra, you will be prompted to go through the initial programming. The Terra initial programming is important, and we hope that this post will assist you in properly setting up your Terra thermostat.
If you prefer to watch a clip of Terra Initial Programming, check out this video:
Subscribe to our YouTube channel!
Short format instructions on Terra Initial Programming
- To get started, you must first create an account at www.my.warmup.com.
- Press accept.
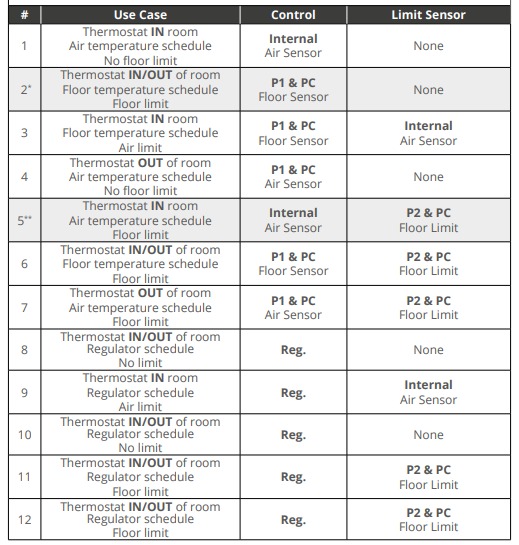
- Follow the use case chart below for the next step:
- Use the arrows to change to your use case and press accept.
- On the WiFi screen, press accept on the check mark icon.
- Use the arrows to change the date accordingly and press accept.
- Select your preferred time format and press accept.
- Use the arrows to change the time accordingly and press accept.
If you would like to connect your Terra thermostat to the MyHeating app, follow these next few steps:
- First, download the MyHeating app to your mobile device.
- Then, press accept on your thermostat.
- Press accept again.
- Use the arrows to move to the Settings icon and press accept.
- Use the arrows to move to the WiFi icon and press accept.
- Use the arrows to select the Settings wheel in the WiFi.
- Now, you have reached the pairing mode screen.
Now, open the MyHeating App on your mobile device.
- Select the three lines at the top left.
- Select the QR Code option.
- Using your camera, hover over the QR Code that is present on the top right of your thermostat.
**It is important to note that your device must be connected to a 2.4 GHz WiFi Network only to continue.
- Once you verify that you are connected to a 2.4 GHz WiFi Network, press connect.
- Select Join.
- Type in your WiFi Network password and press “Next”
- Add a Room Name.
- Add a Room Type.
- Last, add a power source
Full Instructions on Terra Initial Programming
To begin your journey with Warmup, the first step is to create an account by visiting www.my.warmup.com. Once you’re on the website, navigate to the account creation section and follow the prompts to set up your account. After completing the necessary information, press the “accept” button to proceed. Now you are ready to continue on with the Terra Initial Programming.
Next, you will encounter a use case chart that outlines the different steps you need to follow based on your specific scenario. Use the provided arrows to select your use case, and once you’ve made your selection, press “accept” to continue. For reference, use the chart above.
The next step involves the WiFi setup. On the WiFi screen, you will see a checkmark icon. Press “accept” to confirm your WiFi connection. Then, using the arrows, adjust the date displayed according to your preference and press “accept” to save the changes. Similarly, select your preferred time format and adjust the time using the arrows before pressing “accept” to confirm.
If you wish to connect your Terra thermostat to the MyHeating app, follow these additional steps. Start by downloading the MyHeating app onto your mobile device. Once downloaded, return to your thermostat and press “accept” twice to enter the settings menu. Use the arrows to navigate to the WiFi icon and press “accept” to access WiFi settings.
Within the WiFi settings, locate the Settings wheel and select it using the arrows. This will put your thermostat into pairing mode. Now, open the MyHeating app on your mobile device. Tap the three lines at the top left corner of the app to access the menu, and choose the QR Code option. Use your mobile device’s camera to scan the QR Code displayed on the top right of your thermostat.
Please ensure that your mobile device is connected to a 2.4 GHz WiFi network, as it is required for the pairing process. Once connected, tap “connect” on the app. Then, select “Join” and enter your WiFi network password. Follow the prompts to add a Room Name and Room Type to customize your thermostat settings. Finally, specify the power source for your thermostat.
By following these comprehensive steps, you will successfully create an account, set up your WiFi connection, and pair your Terra thermostat with the MyHeating app. Enjoy the convenience and control offered by Warmup and its accompanying mobile app.
If you have any additional questions or concerns, please don’t hesitate to reach out to us. Our support team is available to assist you and address any inquiries you may have. To access our support services, simply reach out to us at 888-927-6333.