Home
/
Installation
/
StickyMat System – DWM
Floor Probe Installation Instructions
Always follow the step-by-step installation instructions for installing the floor probe as indicated in the installation manual.
The floor probe must be placed equidistant between two of the heater wires. Make sure it never touches or crosses the heating wire.
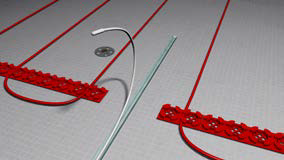
The thermostats come with a 9’ low voltage communication sensor wire. This is to detect the actual floor temperature for accurate programming. The end of the probe wire contains a capped sensor that should be evenly centered between two heating cables at least 12” into the heated area. At no time should it cross the heating cable.
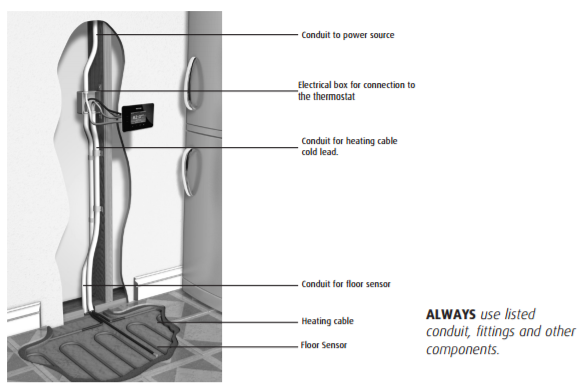
It may be necessary to chisel out a channel in the sub-floor to minimize the possible increase in floor height from the floor probe. Neither the unheated lead or sensor wire must cross, or come into contact with the heating element.
Be sure to keep the sensor wire in a separate 1/2″ conduit from the lead wire. This will prevent any interference and ensure your readings are accurate.
Don’t forget to test your probe. Your electrician can make sure all connections are secure and test it using a multimeter set to the lowest possible ohms scale. The resistance reading should be between 7 and 17 ohms.
Lastly, connect the sensor wires into ports 1 and 2 of the thermostat. The probe wires have no polarity and can be connected in either port.
Please review the installation manual of your heating system for more information.


![Thumbnail [200x250]](/wp-content/uploads/Indoor-Systems-Page-Image.png)
![Thumbnail [200x250]](/wp-content/uploads/image-13.png)
![Thumbnail [200x250]](/wp-content/uploads/Projects-Image.png)