
Electrical Requirements for Warmup Floor Heating: Power, Wiring, GFCI, and Connecting Multiple Heaters
Electric floor heating needs a dedicated circuit (Warmup recommends 20 amps), supply wire sized to the system’s amperage plus a 25% safety margin, and GFCI protection in wet areas. One thermostat can carry up to 15 amps; above that, add a relay. Each relay has a maximum load of 15 amps and the maximum numbers of relays connected to one thermostat is 5 relays. All wiring should be done by a licensed electrician following local electrical code.
Always check the installation manual for your specific product before you begin. The sections below answer the most common electrical questions in the order you will usually need them: power, wire, conduit, GFCI, wiring checks, and connecting more than one heater.
Floor heating electrical requirements at a glance
| Requirement | What Warmup recommends |
| Circuit | Dedicated 20-amp circuit with a max load of 15 amps |
| Standard breaker sizing | System amperage plus at least 25% |
| Thermostat capacity | 15 amps maximum |
| Supply wire | Stranded 3-wire copper with a ground, sized to the breaker load |
| Standard breaker type | Single-pole for 120V, double-pole for 240V |
| GFCI protection | Required in wet areas, from a GFCI thermostat or a GFCI breaker |
| Conduit | 1/2″ for one lead, plus a separate 1/2″ for the floor sensor |
| Load above 15 amps | Add a relay (Relay-25) or a contactor panel |
| Installation | Licensed electrician, following national and local electrical code |
Do I need a dedicated circuit for floor heating?
Yes. Supply each thermostat or relay with a dedicated circuit with a maximum 15-amp load, protected by a maximum 20-amp breaker, so the heater does not share power with other loads. If your panel has no room for a new breaker, an electrician can check whether an existing circuit can carry the heater’s amperage plus a 25% safety margin.
If you do use an existing circuit, its breaker must be able to handle the additional load of the heating system on top of everything already connected to it. Consult an electrician to ensure that the circuit is safe for the total load. Improper wire size and breakers can lead to electrical fires.
How do I know if there is enough power to run my floor heating system?
Divide your system’s wattage by its voltage to get amps, add at least 25% and round up, and confirm the circuit can supply that amount. Your system’s wattage and amperage are listed in the installation manual, on the product box, and on the cold lead tag.
- Find the watts and volts. Check the product box, cold lead tag, or installation manual.
- Calculate the amps. Amps = watts ÷ volts.
- Add a safety margin. Size the breaker to carry at least 25% more than the system’s total amperage.
- Compare to your circuit. The circuit must supply that amount, and a single thermostat can carry no more than 15 amps.
For example, the breaker for a 10-amp load would be sized to a 15-amp standard breaker (10 x 1.25 = 12.5A) rounded up to the next available breaker size.
| System | Power | Voltage | Amps | Amps needed (+25%) |
| 30 sq ft cable heater | 390 W | 120V | 3.3 A | 4.2 A |
| 100 sq ft cable heater | 1,310 W | 120V | 10.9 A | 13.6 A |
| 100 sq ft cable heater | 1,310 W | 240V | 5.5 A | 6.9 A |
Higher voltage means lower amperage for the same wattage. See our guide on choosing 120V vs. 240V floor heating to choose the right voltage for your heated area.
What gauge wire should I use for floor heating?
Use stranded 3-wire copper supply wire with a ground, sized to your breaker. That means hot, neutral, and ground for 120V, or hot, hot, and ground for 240V. For example, a system that needs 12 amps of supply calls for 14-gauge wire under NEC guidelines.
| Breaker size | Typical copper wire gauge |
| 15 amp | 14 AWG |
| 20 amp | 12 AWG |
| 30 amp | 10 AWG |
Warmup also provides gauge guidelines by product line:
| Product | Wire gauge |
| DCM-PRO | 17 gauge |
| Larger mats and cables | 14 gauge |
| Snowmelt systems | 10 gauge |
Requirements can vary by local code and product. This guidance does not replace the licensed electrician, who is responsible for the installation.
What are the conduit requirements for floor heating?
Whether a conduit is required depends on your local electrical code, but Warmup recommends a 1/2″ conduit for one lead and a separate 1/2″ conduit for the floor sensor. Use a 3/4″ conduit if you are connecting more than one heater to one thermostat.
| What you are running | Conduit size |
| One heater lead | 1/2″ conduit |
| Floor sensor | Separate 1/2″ conduit |
| Two or more heater leads to one thermostat | 3/4″ conduit |
A conduit makes it easier to fish the lead wire and sensor probe wire after drywall is installed, and it protects the lead wires from damage. PVC, rigid metal, and flexible (Flex) conduits are acceptable as long as they comply with local electrical code.
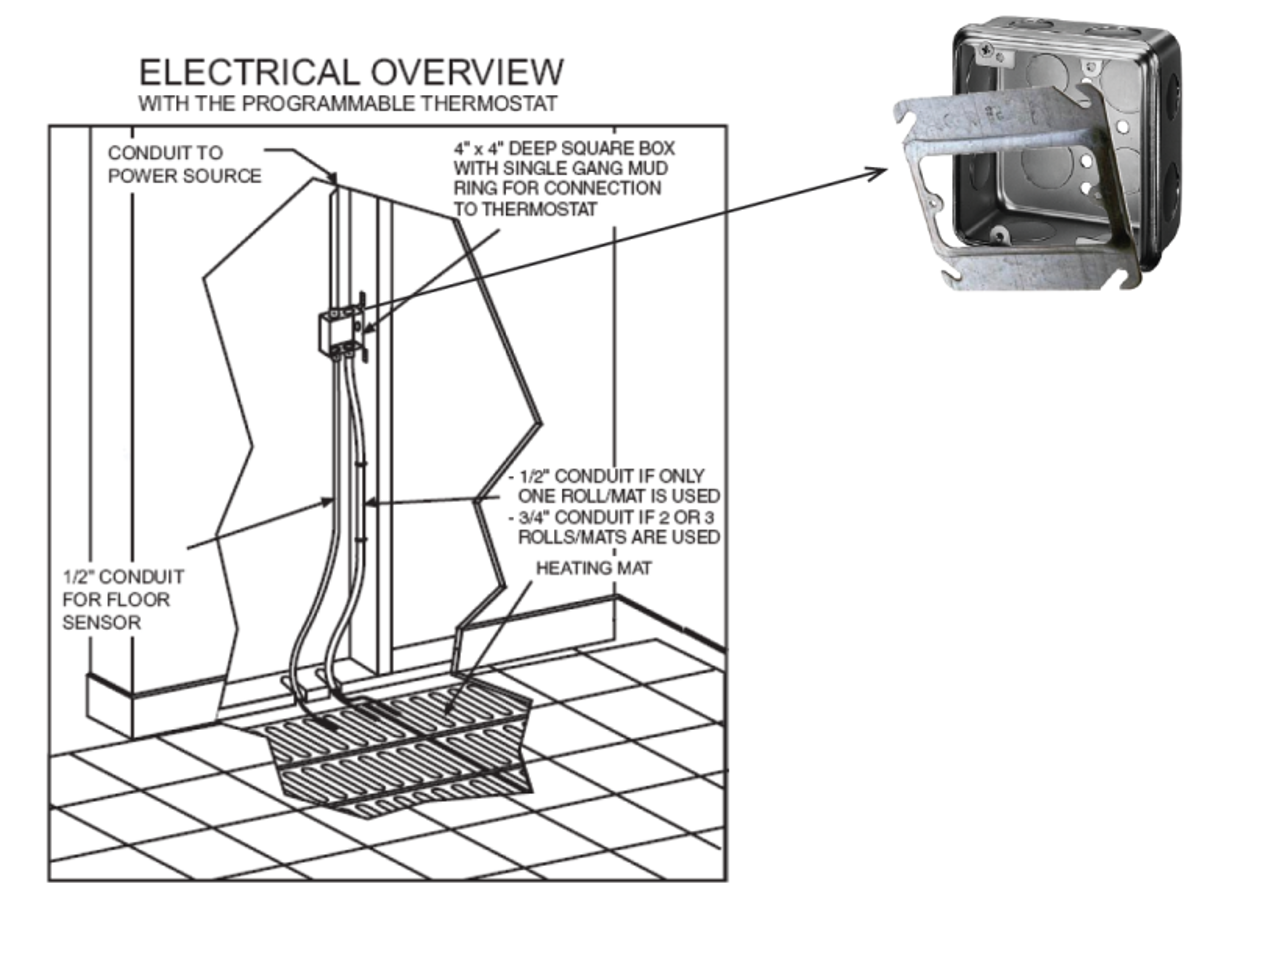
Conduit rules to follow
- Never run the lead wire and the sensor in the same conduit. Doing so causes electromagnetic interference that reduces temperature accuracy and heating performance.
- Never place the factory splice inside a wall or conduit. It must be embedded in cementitious material, such as thinset or self-leveling underlayment.
- Add an elbow or bend at the base. This avoids sharp edges and lets the cable route smoothly from the floor to the electrical box.
Refer to your thermostat and heating cable installation manuals for detailed instructions.
Watch our YouTube video on heating system conduit requirements below:
Is GFCI required for floor heating in bathrooms?
Yes. The National Electrical Code (NEC) requires GFCI protection in all wet areas, including bathrooms. You can meet this requirement with a thermostat that has built-in GFCI, such as the Warmup 7iE or Terra, or with a GFCI breaker if you use a thermostat without GFCI. Do not use both. If your thermostat has built-in GFCI, the breaker must be a standard (non-GFCI) breaker; otherwise, it may cause the thermostat to trip.
The NEC defines GFCI as a device that de-energizes a circuit within an established period of time when current to ground exceeds a predetermined value that is less than what is needed to operate the circuit’s overcurrent protective device. In practice, it monitors the balance of current between the hot and neutral wires. If it detects an imbalance greater than 5mA, the circuit in the thermostat or breaker trips instantly and stops current flowing through the heating cables.
How do I test GFCI?
Test your GFCI monthly. Make sure the floor heating is actively running, then press the “test” button on your thermostat. If the system is not heating, the circuit interrupter will not trip.
Confirm with your local electrician that your installation meets national and local electrical code.
Why does my heater have a ground wire when my thermostat has no ground terminal?
Connect the heater’s protective ground wire to the ground wire from your power supply. The heating system must also be connected through a GFCI, so if your thermostat does not have built-in GFCI protection, use a dedicated GFCI-protected circuit.
This is critical to the safe operation of your heating system. All electrical work must be performed by a qualified electrician in accordance with local building and electrical codes. Your product’s installation and wiring manuals provide detailed wiring guidance.
Can I install a 120V mat on one leg of a double-pole breaker?
No. A double-pole breaker has no neutral leg, and the polarity between its two sides does not match, so a 120V heater cannot be wired across one leg. Use a single-pole breaker with the proper neutral connection for 120V systems.
Wiring a 120V mat this way causes two problems: the thermostat trips repeatedly, and excessive voltage is sent to the 120V heater, which can damage it. See your thermostat installation manual for code-compliant wiring and our 120V vs. 240V guide for which breaker each voltage uses.
Is my electric floor heating system wired correctly?
Have a licensed electrician verify that the heater connects correctly to the thermostat and that the thermostat connects correctly to the electrical panel. Shut off all power at the breaker panel before checking any electrical connection.
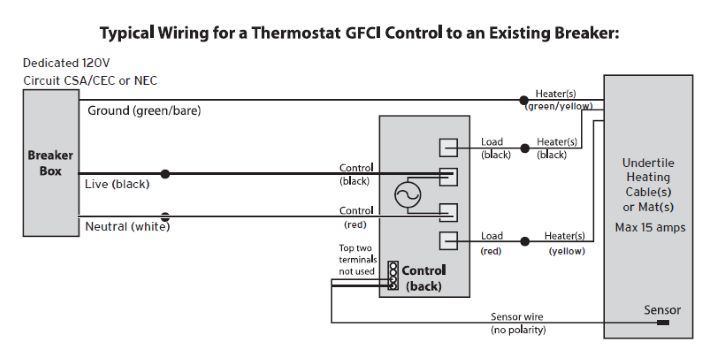
Wiring instructions are in your product’s installation manual, and a video demonstration of proper wiring is available. You can also get additional help through Warmupedia.
| Symptom | Likely cause | What to do |
| Thermostat trips repeatedly | 120V heater wired to one leg of a double-pole breaker | Use a single-pole breaker with a neutral |
| Thermostat trips repeatedly | GFCI breaker installed with a build-in GFCI thermostat | Use a standard (non-GFCI) breaker |
| Thermostat trips repeatedly | Damaged heater with a short to ground | Schedule your electrician and Warmup technical support for system diagnostics |
| GFCI test button does not trip | Floor heating was not running when the test button was pressed | Turn the heating on, then test again |
| Poor temperature accuracy or heating performance | Lead wire and floor sensor share a conduit, or floor sensor is installed incorrectly | Run the wires in separate conduits, or switch the thermostat to operate from its internal air sensor |
| Heater fails | 120V heater connected to 240V power | Match the supply voltage to the heater’s rating |
How many heating cables or mats can I connect to one thermostat?
You can connect up to three heaters to a single thermostat, as long as their combined load stays at or under 15 amps. If it will exceed 15 amps, add a relay or other additional controls.
- All cold leads must reach the thermostat location. If they do not reach, they may be extended using a junction box and the correct size wire. Plan the layout before installation to ensure all leads can be easily connected to the thermostat.
- Running multiple leads through a conduit to the thermostat is acceptable. Use a 3/4″ conduit for multiple systems.
Refer to your system’s installation manual for details specific to your Warmup product.
Can I connect one Warmup heater to another in series?
No. Warmup floor heating systems do not connect to each other in series, a practice called daisy chaining. Each system connects individually to the thermostat, and the combined amperage of all connected systems cannot exceed 15 amps.
What if I need more than 15 amps?
Add a relay to increase the load your thermostat can switch, or have an electrician install a contactor panel. The Relay-25 adds an additional 15-amp capacity to the thermostat.
| Total load | Equipment needed |
| Up to 15 A | Thermostat alone |
| More than 15 A | Thermostat + one Relay-25 for every additional 15-amp load, up to 5 relays |
The Relay-25 works with all Warmup thermostats, connects through a 240V coil, and is built for quiet operation. It must be accessible but does not need to be visible in the room. It may be possible to install it inside a junction box within a cabinet or closet. Consult a qualified electrician for code compliance.
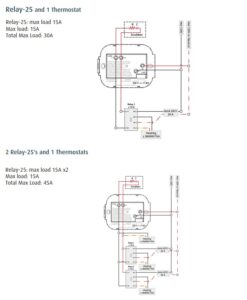
Can I install the Relay-25 in the same electrical box as my thermostat?
No. Install the Relay-25 in a separate single-gang box to avoid overheating and interference with other cables. The relay fits a standard single-gang box and can be mounted in an adjacent closet or in a space above or below the thermostat.
Consult your electrician and refer to local electrical codes for specific installation requirements.
Other frequently asked questions
Who should wire my floor heating system?
A licensed electrician. Correct wiring protects both the heating system and your home’s electrical system. Warmup guidance does not replace the electrician’s responsibility for the installation.
Who do I contact with electrical questions?
Contact Warmup customer support at (888) 927-6333 or ussales@warmup.com or your reseller or installer for details specific to your configuration.